User Guide
Welcome to PingBook
Hi there! Whether you are brand new to command-line tools or already comfortable in a terminal, this guide has you covered. If you have never typed a command before, every step is explained from scratch. If you already know your way around a terminal, you can skim the Quick Start and jump straight to the feature you need.
PingBook is a desktop app for managing contacts. You type short text commands to add, search, and organise people in your phone book. Once you get the hang of it, typing is actually much faster than hunting around with a mouse.
Don’t worry if some of this feels unfamiliar at first. Every technical term is explained the first time it appears, and each step is broken down so you can follow along without guessing.
You’ve got this!
💡 Navigation tip: Use the sidebar on wide screens, or tap Contents on smaller screens to open the table of contents and jump to any section.
Who This Guide Is For
This guide is written for Computer Science students at all levels, from those who have never opened a terminal before to those who use one every day.
If you are new to command-line tools, everything is explained from scratch. If you are already experienced, the Command Summary and per-feature sections are quick to scan.
The only hard requirement: you can open files and folders on your computer and type on a keyboard. Everything else is covered here.
Table of Contents
- Product Description
- Key Terms: Read This First
- Quick Start
- Understanding Commands
- Managing Contacts
- Finding Contacts
- Organising Contacts
- Advanced Features
- Utility Commands
- Data and Storage
- FAQ
- Known Issues
- Command Summary
Product Description
PingBook is a desktop application for managing contacts quickly using typed commands.
You can add, edit, search, organise, and archive contacts without ever touching the mouse. Starred contacts appear at the top of your list, archived contacts stay out of sight until you need them, and command aliases let you create shortcuts for the commands you use most.
If you can type quickly, PingBook lets you manage hundreds of contacts faster than any click-based app.
Key Terms: Read This First
Before diving in, here are the technical terms you will encounter in this guide. They sound more complicated than they are!
Terminal (also called Command Prompt, Command Line, or CLI)
A text window where you communicate with your computer by typing instructions. Instead of clicking icons, you type commands like
cd Documentsorjava -jar pingbook.jar. Think of it like sending text messages to your computer.
- On Windows, it is called Command Prompt (or PowerShell).
- On macOS, it is called Terminal.
- On Linux, it is also called Terminal.
Folder / Directory
A folder on your computer. In terminal commands, folders are referred to as “directories.” They are the same thing.
File path
The full address of a file or folder on your computer, similar to a postal address but for files.
- On Windows, it looks like:
C:\Users\yourname\Documents\PingBook- On macOS/Linux, it looks like:
/Users/yourname/Documents/PingBookThe~symbol is a shortcut that means “your home folder.” So~/Documentsmeans/Users/yourname/Documents.
JAR file (.jar)
A special file type that packages a runnable Java application.
pingbook.jaris the file that contains and runs PingBook. You launch it with a terminal command rather than double-clicking it.
Java
A programming language and platform that PingBook is built on. Your computer needs Java installed for PingBook to work, just as you need a PDF reader to open a PDF. We need Java 17 specifically.
JDK (Java Development Kit)
The full package that installs Java on your computer. When this guide says “install Java 17,” it means install the JDK version 17.
Command
An instruction you type into PingBook’s command box. For example,
listis a command that shows all your contacts.
Parameter
Extra information you attach to a command to tell it what to do. For example, in
add n/Alex Tan, the partn/Alex Tanis a parameter that tells the app the person’s name is “Alex Tan.”
Prefix
The short code before each piece of information, like
n/for name,p/for phone, ore/for email. Each prefix tells PingBook what type of information follows.
Index
The number shown next to each contact in the list (1, 2, 3…). Commands like
deleteandedituse this number to know which contact you mean.
JSON file (.json)
A plain-text file format used to store data in an organised way. PingBook saves all your contacts in a file called
pingbook.json. You can open it in any text editor if you ever need to.
Alphanumeric
Letters (A–Z, a–z) and digits (0–9) only. No spaces, punctuation, or special characters like
@or#.
Case-insensitive
The search does not care whether letters are uppercase or lowercase. For example, searching
alexwill also findAlexandALEX.
Quick Start
This section walks you through installing and launching PingBook for the first time. Follow the steps for your operating system (Windows or macOS).
Step 1: Open your terminal
Your terminal is the text window where you type commands. Here is how to open it:
On Windows
- Click the Start button (the Windows logo in the bottom-left corner).
- Type
cmdin the search bar. - Click Command Prompt in the results.
- A black window with white text will open. This is your terminal.
Alternatively, press the Windows key + R (hold the Windows key and press R), type
cmdinto the box that appears, and press Enter.
On macOS
- Press Cmd + Space (hold the Command key and press Space) to open Spotlight Search.
- Type
Terminaland press Enter. - A white (or dark) window with text will open. This is your terminal.
Alternatively, open Finder, go to Applications → Utilities, and double-click Terminal.
You will see a prompt like C:\Users\yourname> (Windows) or yourname@MacBook ~ % (macOS). This is normal; it means the terminal is ready for your input.
Step 2: Check Java is installed
PingBook needs Java 17 (a specific version of the Java platform) to run. Let’s check if you have it.
-
In your terminal, type the following exactly and press Enter:
java -version -
Look at the output:
- If you see something like
java version "17.x.x"oropenjdk version "17.x.x", you have the right version. Move to Step 3. - If the version number starts with something other than
17(e.g.11,21), you need to install Java 17. - If you see
'java' is not recognized(Windows) orcommand not found(macOS), Java is not installed yet.
- If you see something like
To install Java 17
-
Windows / Linux: Download and install the JDK (Java Development Kit, which is the package that installs Java) from https://www.oracle.com/java/technologies/downloads/. Choose “Java 17” and pick the installer for your operating system. Run the installer and follow the on-screen instructions, then repeat the check above.
-
macOS: Follow the macOS Java installation guide to install the correct version. macOS requires a specific JDK variant (Azul JDK 17 with JavaFX support) for PingBook to display correctly.
Once installed, close and reopen your terminal, then run java -version again to confirm.
Step 3: Download PingBook
- Go to the PingBook releases page in your web browser.
- Under the latest release, click
pingbook.jarto download it. This is the JAR file (the runnable application file) that contains PingBook. - Create a new folder somewhere easy to remember, for example:
- Windows:
C:\Users\yourname\PingBook - macOS:
/Users/yourname/Documents/PingBook(you can also just call itPingBookinside your Documents folder)
- Windows:
- Move
pingbook.jarinto that folder.
💡 Why a dedicated folder? PingBook automatically creates a data folder next to pingbook.jar to save your contacts. Keeping pingbook.jar in its own folder keeps everything tidy.
Step 4: Navigate to your folder
Now you need to tell your terminal to “go to” the folder where pingbook.jar lives. You do this with the cd command (short for change directory, which means change which folder you’re in).
On Windows
cd C:\Users\yourname\PingBook
Replace yourname with your actual Windows username. Press Enter.
On macOS/Linux
cd ~/Documents/PingBook
Press Enter.
💡 Tip: If your folder path contains spaces (e.g. My PingBook), wrap the whole path in quotation marks:
cd "C:\Users\yourname\My PingBook"
After pressing Enter, your terminal prompt will update to show the new folder. For example, on Windows you might see C:\Users\yourname\PingBook>.
To confirm pingbook.jar is there, you can list the files in the folder:
- Windows: type
dirand press Enter - macOS/Linux: type
lsand press Enter
You should see pingbook.jar in the list.
Step 5: Launch the app
With your terminal open and pointing to the PingBook folder, type the following and press Enter:
java -jar pingbook.jar
This tells Java to run the pingbook.jar file.
✅ Expected result: The PingBook window opens with a set of sample contacts already loaded. You should see a text box at the top, a result display directly below it, and the contact list underneath.
⚠️ Nothing happened? Check that:
- You are in the correct folder (the one that contains
pingbook.jar). java -versionshows version 17.- You typed the command exactly as shown, including the
-jarpart.
UI Overview
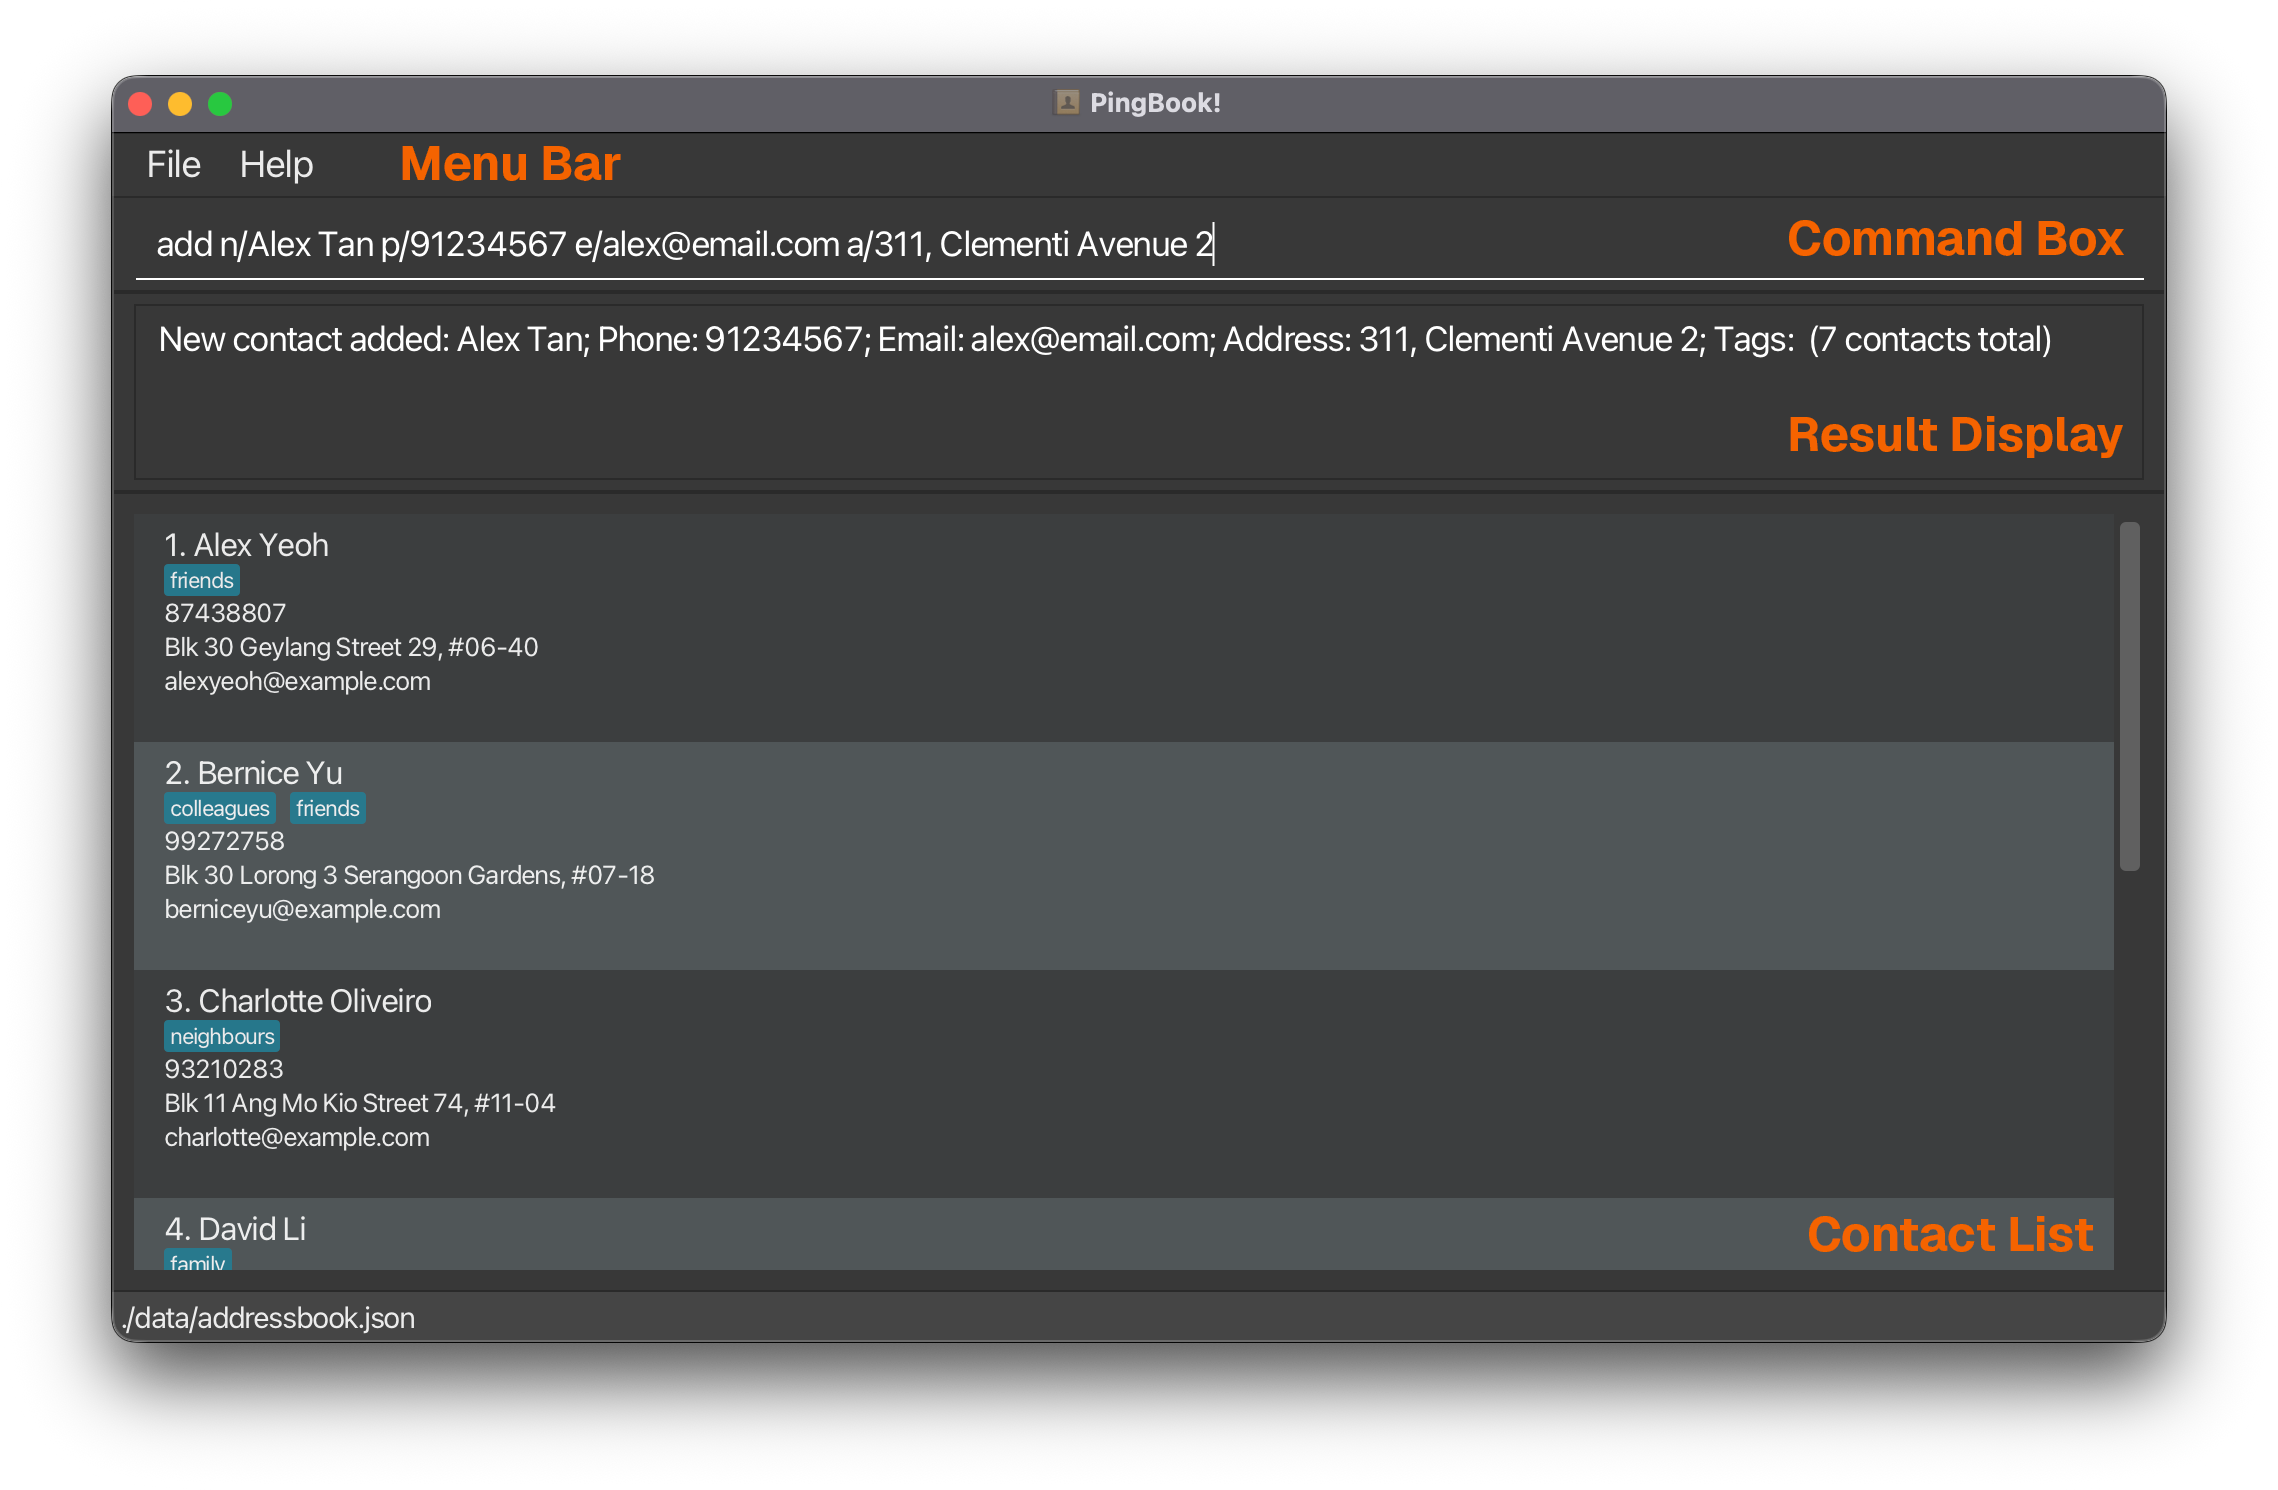
The PingBook window (the user interface, or UI, meaning all the visual elements you interact with) contains four areas:
| Area | Description |
|---|---|
| Menu bar | The row of menus (File, Help) at the very top of the window. |
| Command box | The text field where you type commands. Click here first before typing. |
| Result display | The panel below the command box that shows the outcome of each command, including success messages and error messages. |
| Contact list | The panel below the result display that shows all currently displayed contacts. |
Your First Command
Let’s add your first contact to make sure everything is working.
- Click inside the Command box (the text field near the top of the window).
-
Type the following command exactly as shown, then press Enter:
add n/Alex Tan p/91234567 e/alex@email.comHere,
n/is the prefix for name,p/is the prefix for phone number, ande/is the prefix for email.
✅ Expected result:
The result display shows New contact added: Alex Tan; ... and Alex Tan appears in the contact list below the result display.
Congratulations! You’ve just used your first PingBook command!
Understanding Commands
All PingBook commands follow the same basic structure: a command word (what you want to do) followed by parameters (the details).
Here are the rules for reading command formats throughout this guide:
- Words in
UPPER_CASEare placeholders for values you provide. For example, inadd n/NAME, you replaceNAMEwith an actual name:add n/Alex Tan. - Parameters inside
[square brackets]are optional; you can include them or leave them out. For example,[a/ADDRESS]means you may omit the address. - Parameters followed by
...can be repeated as many times as you like. For example,[t/TAG]...means you can add zero or more tags:t/friend t/colleague. - Parameters can be typed in any order.
n/Alex p/91234567andp/91234567 n/Alexproduce the same result. - Commands that take no parameters at all (such as
list,help,exit,clear,sort, andlistarchived) will simply ignore any extra text you type after the command word.
⚠️ Copying from a PDF? If you copy a command from a PDF version of this guide and paste it into the command box, check that no extra spaces or line breaks were inserted. If the command does not work, try typing it out manually instead.
Managing Contacts
Adding a contact: add
Add a new contact to your address book.
Format: add n/NAME p/PHONE e/EMAIL [a/ADDRESS] [t/TAG]...
Each prefix (n/, p/, e/, etc.) tells PingBook what type of information follows it. The table below explains what is required and what rules apply:
Field constraints
| Field | Required? | Rules |
|---|---|---|
n/NAME |
Yes | Letters and digits only (alphanumeric), spaces allowed. |
p/PHONE |
Yes | Digits only, at least 3 digits long. |
e/EMAIL |
Yes | Must follow the format localpart@domain (e.g. alex@email.com). |
a/ADDRESS |
No | Any text. Can be added later using edit. |
t/TAG |
No | Letters and digits only, no spaces. Use separate t/ prefixes for multiple tags. |
Steps
- Click the Command box.
- Type
addfollowed by the contact’s details using the prefixes shown above. - Press Enter.
📌 Example:
add n/Priya Sharma p/87654321 e/priya@company.com a/10 Orchard Road t/colleague
This adds a contact named Priya Sharma with a phone number, email, address, and the tag “colleague.”
✅ Expected result:
New contact added: Priya Sharma; Phone: 87654321; Email: priya@company.com; Address: 10 Orchard Road; Tags: [colleague]
💡 Tip: You can add a free-text note to a contact after creating them using the remark command. See Adding a remark.
Editing a contact: edit
Change one or more details of an existing contact.
Format: edit INDEX [n/NAME] [p/PHONE] [e/EMAIL] [a/ADDRESS] [t/TAG]...
INDEXis the number shown next to the contact in the current list (e.g. if Priya is contact number 3, useedit 3 ...).- You must change at least one field; you cannot run
edit 3with nothing after it. - Any field you leave out stays unchanged, except tags: if you include any
t/value, it replaces all existing tags. To remove all tags entirely, uset/with nothing after it.
Steps
- Type
listand press Enter to see all contacts and their index numbers. - Type
editfollowed by the index number and the fields you want to update. - Press Enter.
📌 Example: update phone and email for contact 3
edit 3 p/99887766 e/priya.new@company.com
✅ Expected result:
Edited Person: Priya Sharma; Phone: 99887766; ...
📌 Example: remove all tags from contact 3
edit 3 t/
✅ Expected result:
Edited Person: Priya Sharma; Tags: []
⚠️ Watch out with tags: Editing tags replaces all existing tags at once. For example, edit 3 t/vip removes every previous tag and leaves only vip.
Adding a remark: remark
Add, update, or remove a free-text note attached to a contact. This is useful for personal reminders like “Prefers email” or “Met at orientation week.”
Format: remark INDEX r/REMARK
- To remove an existing remark, type
r/with nothing after it.
Steps
- Type
listand press Enter to find the contact’s index number. - Type
remark INDEX r/followed by your note. - Press Enter.
📌 Example: add a remark to contact 2
remark 2 r/Prefers contact by email only.
✅ Expected result:
Added remark to Person: ...
📌 Example: remove the remark from contact 2
remark 2 r/
✅ Expected result:
Removed remark from Person: ...
Deleting a contact: delete
Permanently remove a contact from your address book.
Format: delete INDEX
Steps
- Type
listand press Enter to find the contact’s index number. - Type
deletefollowed by the index number. - Press Enter.
📌 Example: delete contact number 4
delete 4
✅ Expected result:
Deleted Person: ...
⚠️ Warning: Deletion is permanent and cannot be undone. If you just want to hide the contact for now without losing their data, use archive instead.
Finding Contacts
Listing all contacts: list
Show all your active (non-archived) contacts.
Format: list
- Starred contacts appear before unstarred contacts.
- Archived contacts are not shown here. Use
listarchivedto see them.
Steps
- Type
list. - Press Enter.
✅ Expected result:
Listed active contacts and all active contacts appear in the list.
Searching by name: find
Show only the contacts whose names contain the words you search for.
Format: find KEYWORD [MORE_KEYWORDS]
- The search is case-insensitive, meaning it does not matter whether you use uppercase or lowercase letters.
alexmatchesAlex. - Only complete words are matched. Searching
Alwill not findAlex; you need to type the full wordAlex. - If you type multiple keywords, contacts matching any one of them are shown. For example,
find alex davidshows everyone named Alex and everyone named David. - Only the contact’s name is searched, not their phone number, email, or tags.
Steps
- Type
findfollowed by one or more name keywords. - Press Enter.
📌 Example: find all contacts named Alex or David
find alex david
✅ Expected result:
2 persons listed! and the matching contacts appear.
💡 Tip: To search by tag instead of name, use the filter command.
Filtering by tag: filter
Show only the contacts that have a specific tag attached to them.
Format: filter t/TAG [t/MORE_TAGS]
- Tag matching is case-insensitive.
Friendmatchesfriend. - If you provide multiple tags, contacts that have any one of those tags are shown.
- Archived contacts are never included in filter results.
Steps
- Type
filter t/followed by the tag name. - Press Enter.
📌 Example: show all contacts tagged “colleague” or “vip”
filter t/colleague t/vip
✅ Expected result:
N persons listed! where N is the number of matching contacts.
Sorting contacts: sort
Reorder your contact list so that starred contacts appear first, and all remaining contacts are sorted alphabetically by name.
Format: sort
Steps
- Type
sort. - Press Enter.
✅ Expected result:
Sorted all persons (starred first, then by name) and the contact list reorders accordingly.
Organising Contacts
Starring a contact: star
Mark a contact as important so they always float to the top of the list.
Format: star INDEX
Steps
- Type
listand press Enter to find the contact’s index number. - Type
starfollowed by the index number. - Press Enter.
📌 Example: star contact number 2
star 2
✅ Expected result:
Starred Person: ...
💡 Tip: After starring several contacts, run sort to group all starred contacts at the top of the list.
Removing a star: unstar
Remove the starred status from a contact.
Format: unstar INDEX
Steps
- Type
listand press Enter to find the contact’s index number. - Type
unstarfollowed by the index number. - Press Enter.
📌 Example: unstar contact number 2
unstar 2
✅ Expected result:
Unstarred Person: ...
Archiving a contact: archive
Hide a contact from the main list without deleting them. Useful for people you rarely contact but still want to keep on record.
Format: archive INDEX
- Archived contacts are hidden from
list,find, andfilterresults. - To see archived contacts, use the
listarchivedcommand.
Steps
- Type
listand press Enter to find the contact’s index number. - Type
archivefollowed by the index number. - Press Enter.
📌 Example: archive contact number 5
archive 5
✅ Expected result:
Archived Person: ... and the contact no longer appears in the active list.
Restoring an archived contact: unarchive
Move an archived contact back to your active list.
Format: unarchive INDEX
Steps
- Type
listarchivedand press Enter to see archived contacts and their index numbers. - Type
unarchivefollowed by the index number. - Press Enter.
📌 Example: restore the first archived contact
listarchived
unarchive 1
✅ Expected result:
The contact disappears from the archived list and reappears when you run list.
Listing archived contacts: listarchived
Show all contacts that have been archived.
Format: listarchived
Steps
- Type
listarchived. - Press Enter.
✅ Expected result:
Listed archived contacts and all archived contacts appear in the list.
Advanced Features
Creating command aliases: alias
Create a personal shortcut word that triggers a built-in command. For example, you could create a as a shortcut for add so you type less.
Format
| What you want to do | Command |
|---|---|
| Create a new shortcut | alias add ALIAS COMMAND_WORD |
| Remove a shortcut | alias remove ALIAS |
| See all current shortcuts | alias list |
ALIASis the shortcut word you want to create. It must not clash with any existing command word or alias.COMMAND_WORDmust be one of PingBook’s built-in commands (e.g.add,delete,find).
To create a shortcut
- Type
alias addfollowed by your chosen shortcut word and the command it should trigger. - Press Enter.
📌 Example: create shortcut a for the add command
alias add a add
After this, you can type a n/Alex p/91234567 e/alex@email.com instead of the full add command.
📌 Example: see all your current shortcuts
alias list
📌 Example: remove the shortcut a
alias remove a
Editing the data file directly
PingBook automatically saves all your contacts to a JSON file (a plain-text data file) at data/pingbook.json inside the same folder as pingbook.jar. If you ever need to make many changes at once, you can open this file in any plain-text editor (such as Notepad on Windows or TextEdit on macOS) and edit it directly.
⚠️ Warning: JSON files must follow a strict format. If you accidentally delete a comma, bracket, or quotation mark, the file becomes invalid. When PingBook detects an invalid file, it discards all data and starts completely empty on the next launch. Always make a backup copy of pingbook.json (e.g. save a copy as pingbook_backup.json) before editing it manually.
Utility Commands
Viewing help: help
Open the help window, which shows a link to this User Guide.
Format: help
Steps
- Type
help. - Press Enter.
✅ Expected result: A help window opens showing a link to this User Guide.
💡 Tip: You can also press F1 on your keyboard at any time to open the help window without typing a command. (Just press the F1 key, usually found in the top row of your keyboard.)
Clearing all contacts: clear
Delete every single contact from your address book at once.
Format: clear
⚠️ Warning: This deletes all contacts permanently and cannot be undone. Before running this command, make a backup copy of data/pingbook.json in case you need the data later.
Steps
- Type
clear. - Press Enter.
✅ Expected result: The contact list becomes empty.
Exiting the app: exit
Close PingBook. Your data is saved automatically before the app closes, so you do not need to do anything extra.
Format: exit
Steps
- Type
exit. - Press Enter.
Data and Storage
How your data is saved
PingBook saves your contacts automatically after every command that changes anything. You never need to press a “Save” button.
Where your data lives: data/pingbook.json, located inside the same folder as pingbook.jar.
Transferring your data to another computer
Want to use PingBook on a different computer and bring your contacts with you? Here’s how:
- On your current computer, find and copy the file
data/pingbook.json. - On the other computer, install Java 17 and follow this Quick Start guide to download
pingbook.jarand launch it once. This creates thedatafolder automatically. - Replace the
data/pingbook.jsonfile on the new computer with the copy you brought over. - Launch PingBook on the new computer. All your contacts will appear.
FAQ
Q: I ran a command but the contact list did not change. What do I do?
Look at the result display panel just below the command box. It always shows what happened, including a specific error message if something went wrong. Common issues are a missing required field, or using an index number that is larger than the number of contacts currently shown.
Q: I added a contact but they don’t appear in the list. Why?
Your contact may have been accidentally archived. Type listarchived and press Enter to check. If they appear there, type unarchive INDEX (replacing INDEX with their number) and press Enter to bring them back to the active list.
Q: Can I have two contacts with the same name?
No. PingBook treats contacts with identical names as duplicates and will not add the second one. Use a slightly different name (like adding a middle initial) if you genuinely need two contacts with the same name.
Q: How do I undo a command?
PingBook does not have an undo command. For irreversible actions like delete and clear, make a backup copy of data/pingbook.json beforehand so you can restore it if needed.
Q: I get an error saying “Unknown command.” What does that mean?
This means PingBook did not recognise the word you typed as a valid command. Check your spelling and make sure there are no extra spaces before the command word. Refer to the Command Summary for the full list of valid commands.
Known Issues
App window opens off-screen after disconnecting a monitor: If you moved PingBook to a second screen and then unplugged that screen, the app window might open in a position you cannot see the next time you launch it. To fix this: find and delete the file preferences.json from the folder containing pingbook.jar, then relaunch the app. This file stores the window position, and deleting it resets the window to the centre of your screen.
Help window does not reappear after being minimised: If you minimise the help window and then press F1 or type help again, no new window appears. The help window is still open; it is just hidden at the bottom of your screen. Look for it in your taskbar (the bar of open apps along the bottom of your screen on Windows, or the Dock on macOS) and click it to bring it back.
Command Summary
Use this table as a quick reference once you are familiar with the app.
| Command | Format | Example |
|---|---|---|
| add | add n/NAME p/PHONE e/EMAIL [a/ADDRESS] [t/TAG]... |
add n/Priya Sharma p/87654321 e/priya@company.com t/colleague |
| edit | edit INDEX [n/NAME] [p/PHONE] [e/EMAIL] [a/ADDRESS] [t/TAG]... |
edit 2 n/Priya Nair e/priya.nair@company.com |
| remark | remark INDEX r/REMARK |
remark 2 r/Prefers email contact. |
| delete | delete INDEX |
delete 3 |
| list | list |
list |
| find | find KEYWORD [MORE_KEYWORDS] |
find priya alex |
| filter | filter t/TAG [t/MORE_TAGS] |
filter t/colleague t/vip |
| sort | sort |
sort |
| star | star INDEX |
star 2 |
| unstar | unstar INDEX |
unstar 2 |
| archive | archive INDEX |
archive 5 |
| unarchive | unarchive INDEX |
unarchive 1 |
| listarchived | listarchived |
listarchived |
| alias add | alias add ALIAS COMMAND_WORD |
alias add a add |
| alias remove | alias remove ALIAS |
alias remove a |
| alias list | alias list |
alias list |
| clear | clear |
clear |
| help | help |
help |
| exit | exit |
exit |